In this article, we will learn how to build a Rich-Text Editor custom visual that supports rich text, images, links, and some nuanced features from word processing apps.
Introduction
Rich text editors have become integral in the way we interact with web applications especially when it comes to content generation. Rich text editors enable you to control the appearance of the text and provide a creative way to build visually appealing reports in Power BI!
Prerequisites
This tutorial assumes that you have a working knowledge of React.
Ensure that you have Node, Yarn, or npm installed on your machine. You can follow the links for instructions on how to install them if you have not installed them already.
Let us first create a simple custom visual by opening the command prompt and navigating to the folder you want to create your project in.
1. Enter the following command
pbiviz new RichTextEditor
2. Navigate to the project’s folder and enter the below command
cd RichTextEditor
4. Clear out all the code present in the constructor and the update method. The file should now look something like this.
export class Visual implements IVisual {

constructor(options: VisualConstructorOptions) {

}
public update(options: VisualUpdateOptions) {

}
}
Set up react in your project
In order to run libraries in React.js within your custom visual framework, you will have to Install React and its corresponding type definitions by following the type steps here.
Install additional dependencies
Install additional dependencies Now that the visual is in place let us integrate the react-draft-wysiwyg library into the custom visual framework by following the below steps.
1. Install the rich text editor library by running the following command into your terminal
npm i react-draft-wysiwyg
2. Now install draft JS for getting editor types by running the following command
npm i draft-js
Setup Editor
Navigate to src folder and create a new folder called as components. We will be placing all our react components into this folder.
Create a new file called TextEditor.tsx. This will be used as a class component to initialize our text editor.
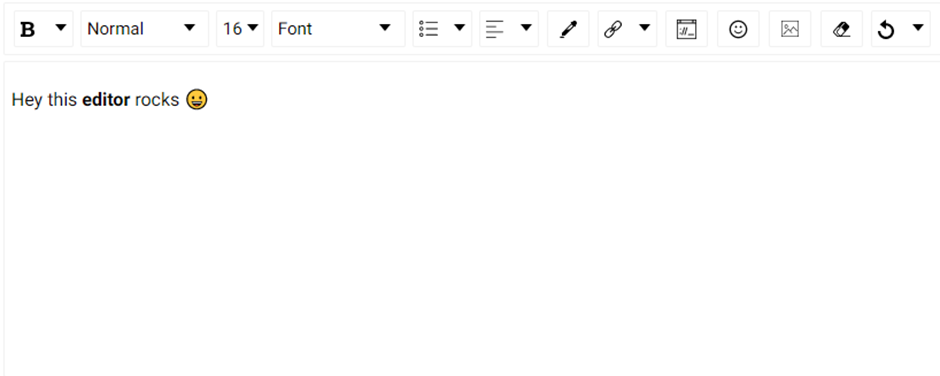
Create a new class called TextEditor and initialize the state of the editor in the constructor. The editor component uses the default Draft.js editor without any styling. The Draft.js editor is built as a controlled ContentEditable component that is based on React’s controlled input API. EditorState provides a snapshot of the editor state. This includes the undo/redo history, contents, and cursor.
We will start with an empty state created using the createEmpty method of EditorState.
5. A controlled editor is achieved using EditorState (the top-level state object for the editor.) If we want to create a controlled editor, we will pass it the following props:
editorState — Prop to update editor state in a controlled way
onEditorStateChange — A function called when there is a change in editor state that takes an object argument of type EditorState
6. After adding these, to our editor component, it will look like this